Friday, August 1, 2014

T-Shirt Diaper Liners

Here they are in all their glory.  These babies have revolutionized my cloth diapering system.  Before I came up with the idea of using these, I was having to rinse off (haha, I mean swish, dunk, and scrub poop off of) my cloth diapers before putting them into the washing machine.  Not fun. 

Cloth diaper liner alternative
I did experiment with other liners first of course.  I have several kinds and never use them because my t-shirt liners are so much better.  Here is a popular brand of disposable liner:


 And here is a flushable diaper liner: 

flushable diaper liner
 Notice anything?  You can see through both of them!  And if light travels through both of them, guess what else travels through these flushable and/or disposable diaper liners?  They don't quite get the job done like I like.  And they are expensive, considering that you have to toss them with every use (even if they are only wet and not dirty, which is the majority of the time).  They also slide around and bunch up when they are on the diaper, so they don't stay in place well.  

So when I came up with the idea of t-shirt liners, I never looked back and have been using them ever since. When I told a few other cloth-diapering mamas about these, they started making and using them too.  Now it's your turn!  Here is how to make these simple and easy liners for free:

1. Get free fabric.  Any 100% cotton t-shirt material works (jersey knit, not bedsheet fabric).  It is so easy to get the material to use for free.  Just clean out your husband's and your t-shirt collections and grab any that have holes or stains or that are stretched out and ready to throw out anyway.  Then go through all your kids' clothes and do the same.  Even 100% cotton knit pajamas and shorts work (as long as they are that t-shirt type fabric that does not fray when cut).  I even had my parents give me their old t-shirts, and pretty soon I had more than I will ever need!  

2. Cut up the t-shirts into rectangles about the size of a sheet of paper.  Don't measure or use a ruler or mark lines.  Just start cutting with good fabric scissors.  Estimate the size and cut quickly.  My liners are not perfect rectangles, as you can see, and they are all a little bit different in size. Go ahead and cut up a big pile of these. 
cloth diaper liner
3. To use these wonderfully soft, 100% cotton diaper liners, follow this little tutorial:

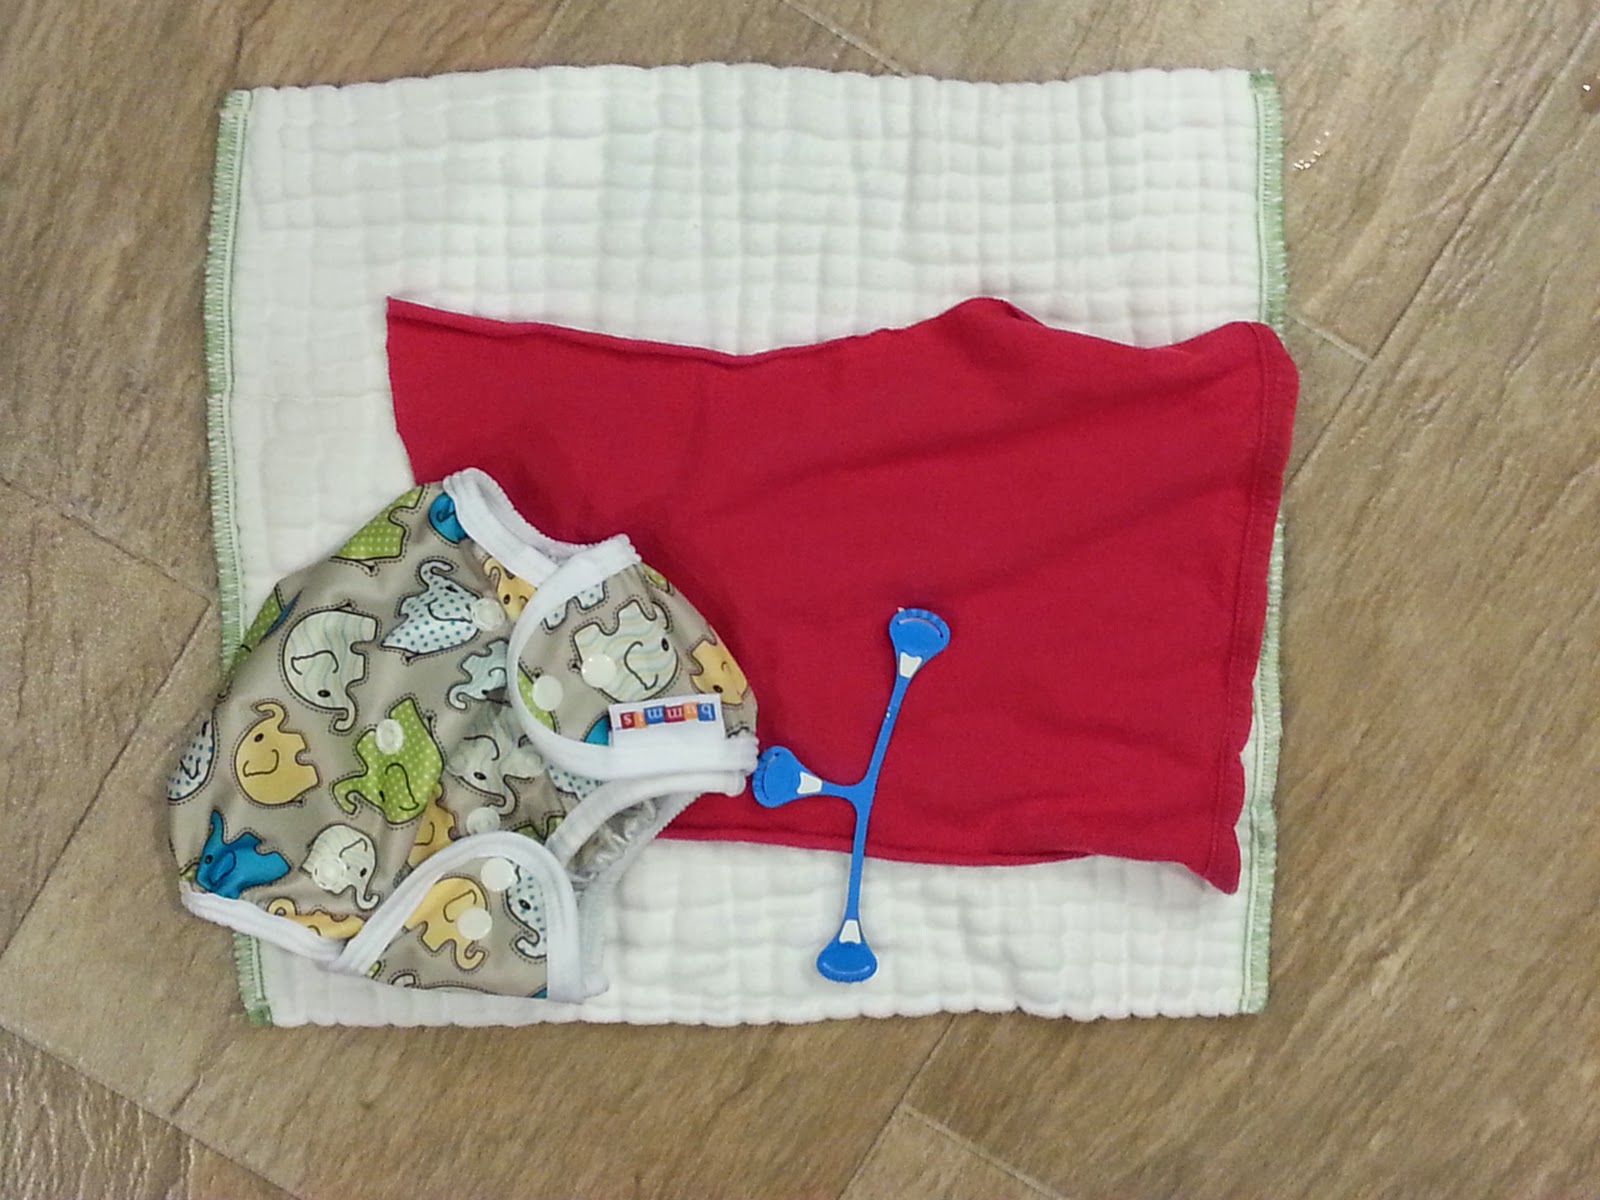
First, gather the 4 pieces of your simple diapering system, the prefold, the t-shirt liner, the snappi, and the cover.
cloth diaper liner

Simply lay the t-shirt liner on the prefold as shown.

cloth diaper liner
Then roll in the sides, like I explained in my last post.
cloth diaper liner
Bring up the bottom.  Fan out sides, and fasten. 
cloth diaper liner
Here it goes on my baby.  Lay liner on prefold.
cloth diaper liner

Bring the liner up on baby between her legs.

cloth diaper liner
Roll up one side of the prefold while holding the liner in place.  You get really quick at this. 

cloth diaper liner
Roll up the other side in jellyroll fashion, like I explained in my last post.
cloth diaper liner

cloth diaper liner


Now bring up the front of the diaper and fan out the sides tightly. 
cloth diaper liner


Bring around the back wings snugly.  First one side,
cloth diaper liner
then the other side. 
cloth diaper liner
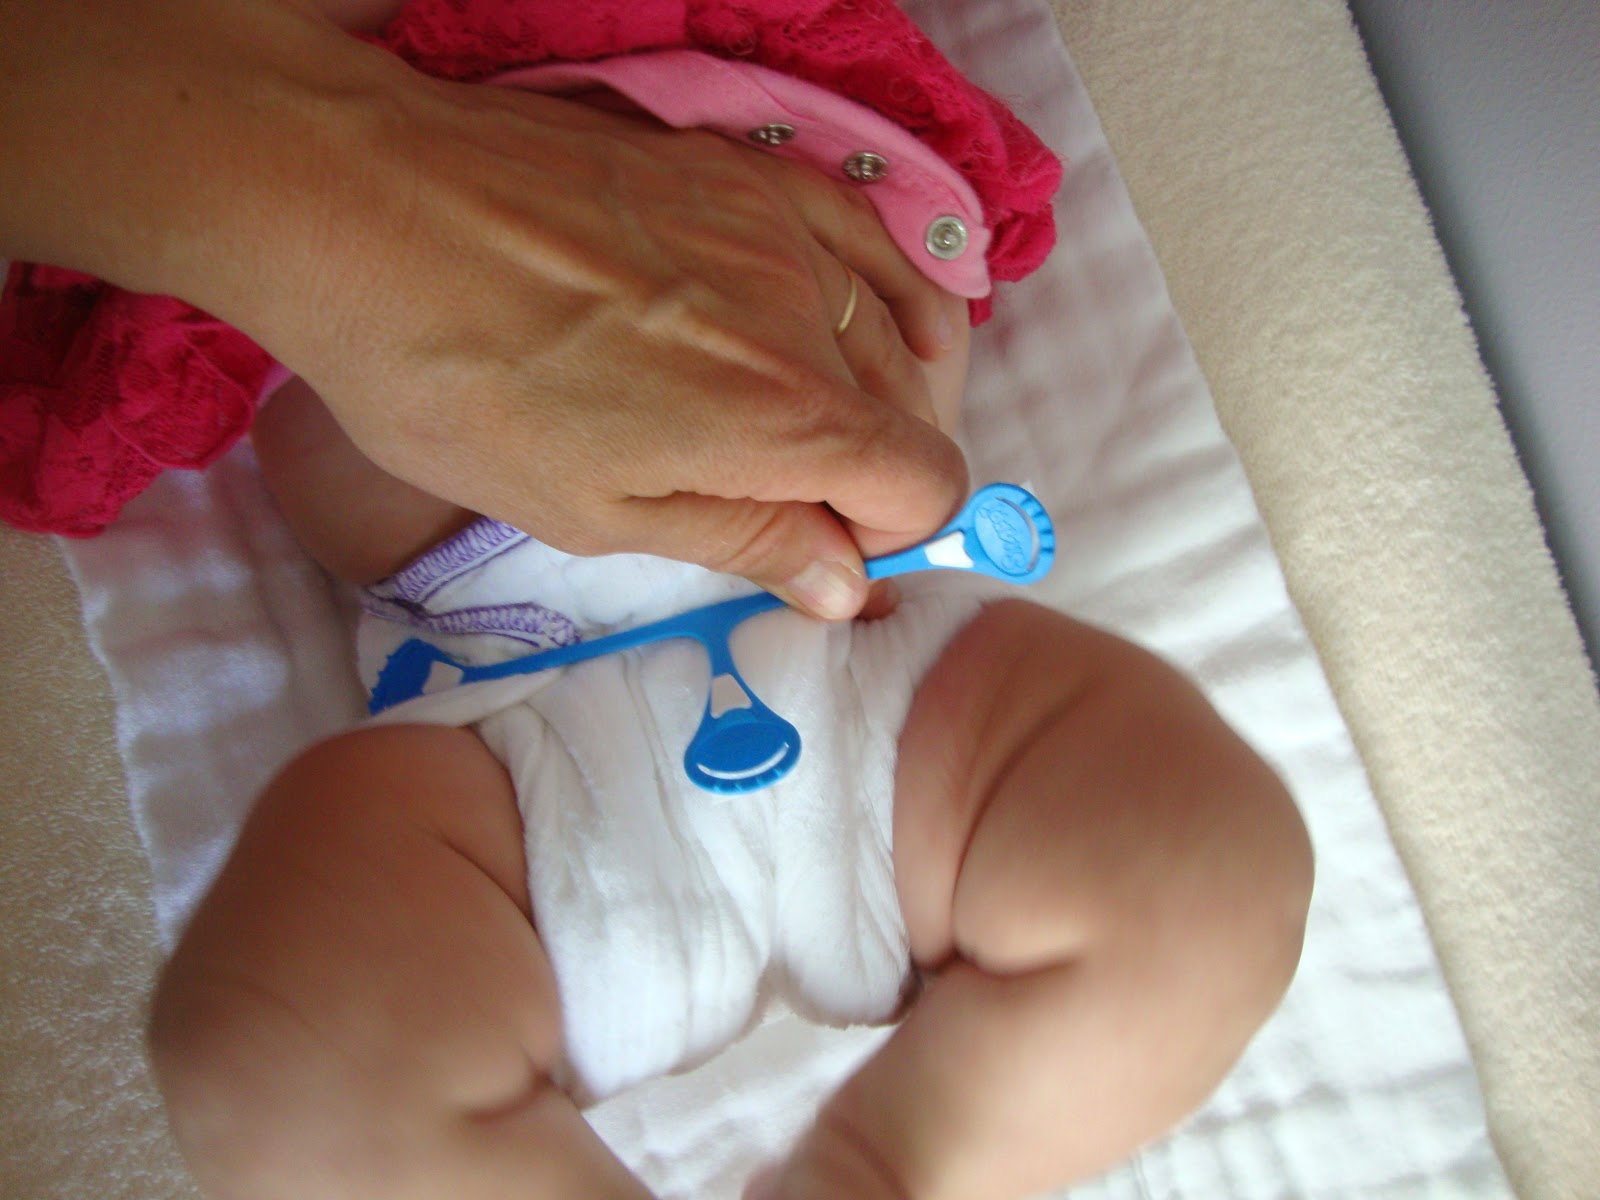
Pull them snugly and fasten with a snappi. 
cloth diaper liner
Since this is a size medium prefold, and my baby is on the small end of the weight range for that size prefold, there is a lot of the prefold sticking out the top, right?  We'll take care of that in a second.
But first pull up and back on the top of both sides of the diaper, and you'll see it snup up on baby's legs.  It is important to get a really snug fit around the legs.
cloth diaper liner
Now simply fold down the front of the prefold over the snappi. 
cloth diaper liner
This ensures a nice, tight fit by folding down the prefold after, not before, it is fastened. 
cloth diaper liner
Notice how the liner is sticking out of the prefold around the legs?  That's how you want it!  The prefold will keep the liner in place this way, and the liner will catch all the mess!
cloth diaper liner

cloth diaper liner

Just make sure when you put the cover on baby, that the cover goes over all the diaper and liner both.  Nothing at all should stick out of the cover, or baby's clothes will get wet. 

cloth diaper liner
Now, here is the great thing about these t-shirt liners: When you go to change your baby's diaper, if the liner is soiled, simply shake solids into the toilet and throw away the liner!  If it is only wet, put the liner into the diaper pail with your diapers and wash it with them.  You will only throw away 1-2 liners a day (only when baby poops), and the rest will be washed and reused.  You were going to throw away all those old, stained, stretched-out, faded t-shirts anyway!  No poop on your diapers to spray (think the ricochet effect) or to swoosh out in the toilet!  These t-shirt liners simply take the poop out of cloth diapering! 
If you think you will use this idea, please like my site on Facebook. (See sidebar on this blog.) Also please share this site with others. Thanks!
The Best Way to Fasten a Prefold

There are many ways to use prefold diapers.  The simplest is to just fold the prefold into thirds (called trifolding) and lay it into the diaper cover.  Then you just put the cover on your baby like you would put on a disposable.  So easy!  This is an effective way to put on prefolds if you know your baby is only going to wet.  Sometimes I do this if my baby just pooped and I know she won't do it again (haha, I've been wrong about this before).

Trifolding Prefolds
a prefold trifolded and laid into a Thirsties diaper cover
Trifolding Prefolds
a prefold trifolded and laid into a Flip cover

The problem is that if and when baby poops, it will almost always get all over the diaper and diaper cover and not stay on the t-shirt liner that you will use with my system of diapering.  So then you would need to clean the mess off of the diaper and cover because you don't want feces in your washing machine, unless it's EBF (exclusively breastfed poo, which washes right out in the washing machine). The other downside to just trifolding the prefold is that, since the prefold is not fastened to the baby, it will get heavy and sag when wet and stretch out the leg elastic on your covers faster.  Not to mention that you will not get a nice trim fit on your baby the same way you will with a fastened prefold.

The best way to fasten a prefold for ultimate containment (to keep poop off your cover) is the jellyroll method.  In my many years of cloth diapering, I have tried just about every method for folding a prefold, and I can tell you from experience, this is the best way to contain messes.  Here it is step-by-step with pictures using a purple-edged size small prefold from diaper junction, which you can find at Cloth diapers & diaper covers at Diaper Junction.

The t-shirt diaper liner that I would normally use with a baby who is not exclusively breastfed is not in this tutorial. You can also see this method with the t-shirt liner.

First, roll one side of the diaper in, starting with the bottom end, as pictured.
Best way to fold a prefold

Then roll the other side in the same way. I actually do both sides at the same time and have gotten so quick at it that I can put a diaper on my baby this way in about 10 seconds.
Best way to fold a prefold

 Next, lay your baby on the diaper with the more "rolled up side" near baby's feet.  
Best way to fold a prefold
 Pull the bottom of the diaper up between baby's legs.
Best way to fasten a prefold

Fan out the front, pulling the sides tight.  You will see the "poop pocket" that is formed this way-so effective.

Best way to fasten a prefold

  Bring the back "wings" around to the front tightly.
 Best way to fasten a prefold


Best way to fasten a prefold
 Grab your snappi with your other hand and secure.
Best way to fasten a prefold
 Fasten the sides first.
 Then fasten the bottom of the snappi.
Best way to fasten a prefold
Here it is with a pink snappi.
 Notice the great fit around baby's legs.
Best way to fasten a prefold
 Really, this method contains messes so well, better than fitted diapers I've used that have elastic around the legs. No red marks on baby's thighs either.  A custom fit every time!
Best way to fasten a prefold
 If you find that it is not tight around baby's legs, simply pull up on the front top of the diaper on both sides and the legs will snug up.

Best way to fasten a prefold
 Look at that tight fit around baby's back too; I've never had a blow-out up the back with this method. My diaper covers stay clean almost every time.
Best way to fasten a prefold

This size small prefold from Diaper Junction-see Cloth diapers & diaper covers at Diaper Junction fits my 14-pound 3-month old perfectly.  She also fits into the size medium, but I have to fold down the front.

The size medium prefold is so versatile, it fits my 30-pound 3-year-old as well.  She is potty-trained, but was happy to model diapers for me in exchange for a small reward of candy. :)  So here is the size medium prefold (green edge) on her, fastened the same way: 
Best way to fasten a prefold

Best way to fasten a prefold
 Trimmer, softer, less expensive, and more effective than fitteds!
Best way to fasten a prefold

The Simple System

Of all the many systems of cloth diapering, here is what I believe is the simplest, most effective, and most inexpensive system of cloth diapering.  The method involves using simple prefolds and diaper covers...with a twist.  Let me explain.
the cast of characters: prefold, t-shirt liner, snappi, and cover

1.  Buy prefold diapers only. By using 100% cotton prefold diapers (see the Cloth diapers & diaper covers at Diaper Junction for these great Diaper Rite prefolds I have pictured) instead of expensive fitted diapers, you save a ton of money.  Each prefold costs around $2, compared to fitteds which cost around $10-$15 each or more.  But aren't fitteds better for containing explosive poops?  NO!  After trying lots of different styles of fitteds, I can assure you that my method of fastening on a prefold will be even more effective at keeping "everything in."

2.  Use a "t-shirt diaper liner" with every diaper after your baby is out of the newborn (exclusively breastfed) stage.  Here is what makes this system different than the usual "prefolds and covers" systems out there. By using a t-shirt diaper liner with your diapers, when baby poops the poop will not get on your diapers.  That means no swooshing, dunking, or spraying your diapers, and no poop in the washing machine.  But can't you just buy disposable or flushable diaper liners?  Yes, you can and I have used them.  But these are expensive.  They are also ineffective because they are slippery so they don't stay in place well, but instead tend to bunch up and move around, thus negating their purpose.  Not to mention, they are not cotton and usually not as soft as 100% cotton.  Isn't that why we are cloth diapering in the first place?  We like cotton next to our babies' bottoms, right? 

3. Fasten every diaper on your baby using a snappi.  There are diaper systems out there that tell you to simply lay a prefold (or other absorbent insert) into a diaper cover and fasten it on your baby.  Easy, right?  Yes, it is so incredibly easy and quick to get a diaper on your baby this way.  The problem is when baby does her business (especially the messy kind), and it gets all over the cover.  Then, you have a diaper to spray off or swoosh out, plus a cover with poo all over it to clean up.  I have gotten so quick at fastening diapers on my baby that I can get the diaper fastened and the cover on in about 45 seconds.

4.  Use one-size or "two sizes only" diaper covers so you don't need to keep buying covers as your baby grows.  This just makes sense.  Instead of buying size newborn, small, medium, and large covers, you can get by with just one or two sizes from newborn to potty-training.  And because of my "t-shirt liners," your diaper covers will last a long time too, since they won't need to be washed as often (poo will stay off of them almost all the time).

Monday, July 28, 2014

Disadvantages to Cloth Diapering

Even though there are many advantages to cloth diapering, there are a few disadvantages as well.  However, I believe those disadvantages are so minor, and that the advantages far outweigh them.

One disadvantage is that cloth diapering is more work because you have to wash the diapers.  True.  However, a few more loads of laundry a week is not that much work when you consider that it takes me about 30 seconds to throw them in the washer, another 20 seconds to throw them into the dryer, and then a few more seconds to toss them into a basket for my children to fold and put away.  Even my toddler likes to help with this job.  It is really not a big deal at all, especially with my simple system of diapering that keeps the poop off of the diapers. 

Another disadvantage is that it takes longer to change baby's diaper using cloth than it does using disposable diapers.  True!  I timed myself, and it takes me about 30-45 seconds to change my baby's cloth diaper.  With a disposable, it takes me about 10 seconds.  So, it does take me a little longer per diaper change, which is just more quality time i get with my baby while I sing and talk to her.

The final disadvantage is that clothes sometimes don't fit as well over cloth diapers.  Cloth diapers are, after all, a little bulkier than disposables. However, the cuteness factor of a baby in a cloth diaper outweighs this, in my opinion!
Disadvantages to cloth diapers